Pages

Showing posts with label Modeling. Show all posts

March 5, 2013

CG Hat

This is another project from the shader programming class.  We had to put an object in a photograph and make it so no one could tell it was CG.  Unfortunately I can't find all of the in-between steps so you'll have to trust me that it looked pretty laughable in the beginning.  Getting a polygonal model to look like cloth by hand wasn't easy.  The hat was mostly modeled in Mudbox using a crazy process which took quite a while.  Shading and lighting were in Houdini.
Original Photo 
Mostly Finished Model and Texture

Final

November 7, 2012

Finished Berry

Skip a couple days of staring at the computer and one night of babysitting renders and we have a finished berry.

Reference Image
And here's the mess of nodes I made to get the texture.


October 19, 2012

Blueberry progress

Still working on the basic pattern.  At the same time I mutated a sphere in mudbox to get the final model.


January 27, 2012

Demo Reel

Here's my demo reel for now.  It doesn't have any Estefan stuff in it because nothing is finalized enough to show.
(Don't tell youtube, but I think the Vimeo version is better) -> http://vimeo.com/35425141

December 21, 2011

The fun has been doubled

Here is the second image from my still life assignment.  One scene, one semester, two images.
It looks a bit different on each computer, there should be pure blacks and whites when it's at its best.  The first image is my layout render from the shot, I used it as a guide for lighting.
Drawover

Final image

December 17, 2011

Done. Mwhahaha

Here is the final image of my still life project.  But it's not over yet, the assignment was to make two renders of the same objects.  I'll post the second image soon.
Occlusion/Beauty Composite


November 18, 2011

Progress

The last texture to do was the vase, which decided to break.  Any newly created texture just came out black, but I could still apply old ones.  Then all my textures broke.  Not fun, but I did get one last render before everything went bad.
It turns out the Render farm didn't have permissions to some of my files, so I'm rendering locally until it gets fixed.  In the meantime, I had Brent critique and the project ended up ten times better after a few hours of working in his suggestions.

November 9, 2011

We Did it Again

As texturing continued, I had Brent critique the project again.  He suggested adding more details so the image would be more interesting.  A few hours later and it was ten times better.  Again.
before

after

at this point I started lighting

November 2, 2011

The Project Continues

The best part about this project is being in Brent's class.  I didn't like the composition very well and asked him what to do.  His answer was to add more objects.  The next day the scene looked ten times better.  With that out of the way, I started textures.

before
after

October 29, 2011

Slim...

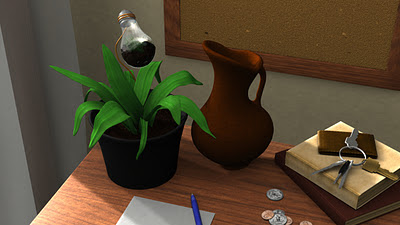
After I got some basic models in, the first thing to work on was the glass texture since nothing inside the lightbulb was visible.  At this point I already decided to use RenderMan for this project, so the best option was a Slim shader.  Unfortunately I didn't know slim so another student showed me the basics and created the texture.  The texture I'm using is recreated from his, but just to be clear I didn't actually make this awesome glass shader.

October 27, 2011

Still Alive

Yep.  I'm alive.  I got wrapped up with projects and haven't posted in a while.  So here's what I've been working on.
sketch


Layout


The assignment is to make a still life in 3D with 12 objects and render it from 2 angles.  I originally wanted to do an environment but that was beyond the scope of the project.  This idea was inspired by a photo I found of a lightbulb terranium, I thought it would make an interesting focal point for a still life.  To create the large plant I made a few basic leaves then brought them into mudbox for some edits and posing.  I think the process helped bring a more organic feel to the leaves.  Then I used a 3d paint effect to create the grass in the bulb.

August 3, 2011

Animation Application

Phew, I just applied to animation the first time.  If I don't get in I only have one other chance.  Anyway, here's a piece I dug up for the application.

And I also just got back from vacation.  I didn't have the camera on much, but here's what I brought back for you.  I hope you enjoy your souvenir. 

July 10, 2011

Spider Tank- Orgin


Alright, I did some research and found out what I just made.  This is what answers.com says-

The mechanical hound is a destructive, man-made monster resmebling a hound. It is a soulless, hollow enforcer that kills thinkers and readers. Unlike the firehouse dog, the Hound does not rescue people. Instead, it either kills them, disables them, or ignores them (even when they are endangered). Physical characteristics of the hound are the fact that it is an eight-legged artificial creature capable of detecting and memorizing the scents of up to 10,000 people. A needle bursts from its nose, and the needle is capable of stunning, paralyzing, wounding, poisioning, and/or killing a victim alltogether (due to the different poisons it stores).
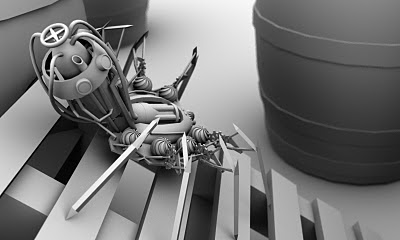
So the final project ended up being kinda far from this description.  The original design had a giant needle for a mouth in addition to the poison tank.  It didn't look right, so it was replaced by a gun barrel.

Here's the final version of the file (at the moment, I may do some photoshoping) that I got to with some input from the teacher and the T.A.

July 9, 2011

Spider Tank

This is my final project for intro to 3d.  It was a lot of fun to work on and it actually wasn't as hard as it looks.  For the most part.  The TA showed me how to do occlusion, which really helped finish it off.  The design is based off a drawing I did in high school to illustrate something from Fahrenheit 451.  I forgot what the machine did in the book.  If you can remember what the machine is, let me know.  Anyway, I redesigned the spider using steampunk gears and got this.

July 1, 2011

Lego Man Edit

The teacher looked at the file and made some suggestions on the lighting.  So here's the new and improved lego man.  This one should look good on most computers, depending on your monitor settings.  When it looks just right his sunglasses are black and you can still see the outline of his hat.  Enjoy.


June 28, 2011

Invisible Man

Our assignment in 3D was to create a Lego man and add texture.  When I looked up reference material I noticed that the Invisible Man has been in a lot of movies and even a few tv shows, so he doesn't have a set look.  With the lighting I tried to go for a dark and mysterious feel to evoke the feeling of the old black and white movie.  Unfortunately it appears too dark on several screens and too light on others.

June 20, 2011

Castle revisited

I had extra time and wanted to work on the model more, so here is the revised version.


June 16, 2011

Intro to 3D


Here are some shots from my 3d modeling class.  The first project was to create a simple castle.

January 9, 2011

We Did it Again

Brent saw my progress and suggested more details to make it interesting.  The project isn't due until mid-December so why not?
before

after